How Easy is It to Move an Outlet to Another Breaker
Dan has been a licensed journey-level electrician for 17 years. He has extensive experience in most areas of the electrical trade.
Adding and Wiring New Outlets
Do you need extra outlets and you'd rather plug into a wall? Power bars are unsightly and who wants extension cords snaking all over the floor? Besides, these can be fire hazards as well as overly attractive to small children.
Maybe you are changing the location of the TV or installing an over-the-range microwave, or maybe you bought a new computer desk. Whatever the reason, there isn't a handy outlet for the equipment and you need one. This is when it becomes necessary to add a new plug-in by wiring it into an existing one.
This article will walk you through not only the mechanics of putting a new electrical outlet into the wall, but also running the wire and tapping into the existing circuit. The tools and materials will be discussed as well as the procedures and tips for doing the job in the easiest manner possible.
While the task will take some work and may involve crawling through attics or crawl spaces, it is not particularly esoteric or difficult to understand. You can do it.
Most of these items should be in your tool box, but some are a little more specialized. If you don't have a tool, I've listed others that might be used to do the job:
- Drill. Some form of drill will be necessary, one that's capable of drilling through about five inches of wood. A drill bit of about ¾" will do the trick. A spade bit is fine here. A second, smaller bit around 1/8" can be very useful. A cordless drill is ideal, but if yours has a cord, you will need an extension cord as well.
- Saw. A small square will need to be cut into the wall where the new outlet is to be installed. You could use a razor knife (box cutter), a jab saw for drywall, or a jigsaw for paneling (or drywall). It will be very handy to have a metal-cutting blade for the jigsaw, or some other saw blade that will cut nails—even a plain hacksaw blade will do.
- Wire cutters. You will need a way to cut wire and strip insulation off of it. Wire strippers are preferred, but other tools will do. Electrician's diagonal wire cutters will be useful.
- Tape measure. You need a way to measure, because locating the place to cut into the wall or the hole to be drilled must be done with precision.
- Screwdriver. You will need a Phillips-head screwdriver, and a flat blade will be handy as well.
- Pliers. A pair of needle-nose pliers will be very handy to have.
- Flashlight. You will be working in either an attic or crawl space, and you will need some light to work by.
- Voltage detector. A non-contact voltage detector is always very nice to have. Although not strictly necessary, it is a wonderful addition to your toolbox and can protect you from shock hazards.
Before You Start
Before rushing out to the store, please read through this article first. It will be more difficult to cut two nails with a simple hacksaw blade rather than with a brand new cordless sawzall, but it's also lots cheaper. Some of these tools are nice to have and use, but are not absolutely necessary and it doesn't always make sense to spend $50 for a new tool to save ten minutes of work (unless, of course, that is the only way to get that new tool okayed by your spouse!).
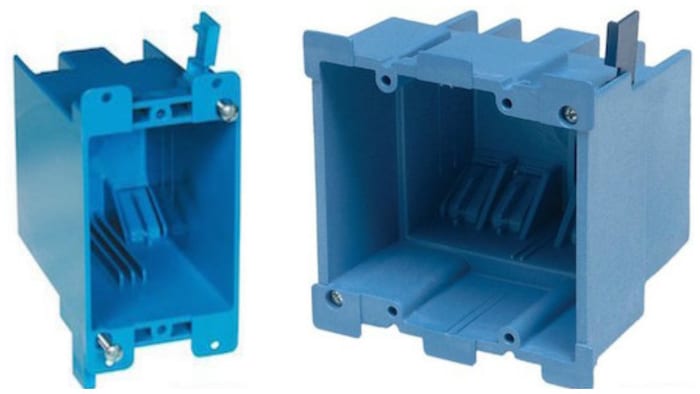
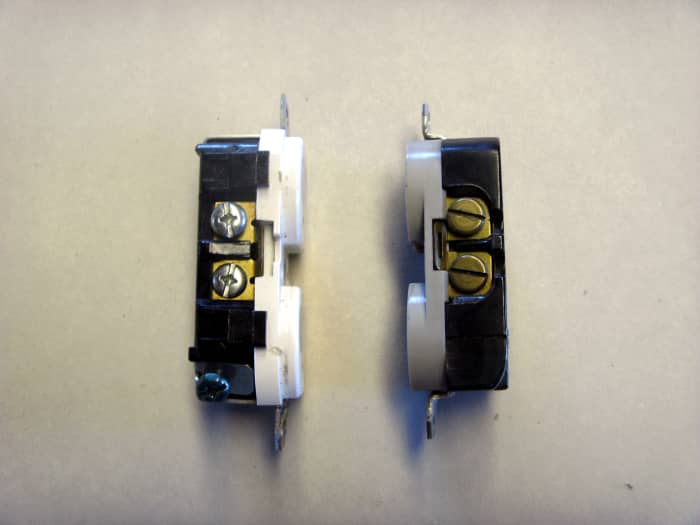
Single gang box (left); two-gang box (right).
Materials You'll Need
- Two new plastic "old work" or "cut in" boxes (see above photo). One of the old work boxes should match the existing box. If the existing box has two outlets in it (four places to plug into), a "two-gang" box will be necessary. (Most outlets are single, though, meaning they have just two places to plug into.) The new box can be any size you want. You could even add in a 4 gang box (with 4 receptacles giving 8 plug-ins) if there is room between the studs in the wall. Try not to buy very shallow boxes in either case. A 3-inch-deep box is far preferable to one that is only a couple of inches deep.
- Wire. Before purchasing wire, locate the circuit breaker that feeds the existing outlet. It will have either a 15 or a 20 stamped on it; this refers to the amps available on that circuit. A 15-amp circuit breaker will require 14-2 NM (Romex) wire (with ground), while a 20 amp circuit breaker will need 12-2 wire, also with a ground. How much wire you will need depends on if it will be run overhead in the attic or below the floor in the crawl space. If the old and new plug-ins are separated by studs, measure how much wire it will take to start at the old outlet, run up through the attic (or down through the crawl space), over the new location, and down (or up) to connect to the new outlet. Up, across, and back down. In my experience it is all too easy to purchase insufficient wire, and it is often that "up and down" that gets forgotten.
- A new outlet with a cover plate. Outlets are available in 15 amp or 20 amp capacity; choose the one that matches the breaker on the circuit, just as you did for the wire. Various colors are available, in different shapes, sizes, and materials. All but the ampacity are personal choices. A note of caution, though: If the existing outlet does not accept a three-prong cord, the new outlet must be a GFCI type. The instructions further down will guide you through the installation, replacing the existing outlet with a GFCI and adding a new outlet. While GFCI outlets are considerably more expensive, don't skimp here. The National Electric Code requires that any outlet without a ground must be a GFCI, and for good reason: without a ground wire the shock hazard increases dramatically. The GFCI outlet is designed to eliminate that hazard.
- Other supplies. You'll want a handful of wire staples with which to fasten the wire to the house structure and possibly a half-dozen wire nuts.
What Is a GFCI?
A ground fault circuit interrupter (GFCI), also known as a residual current device (RCD), is a device that detects that a current is flowing through an unintended path (like water or a person) and shuts off.
How Can I Tell the Difference Between a 15-Amp and 20-Amp Outlet?
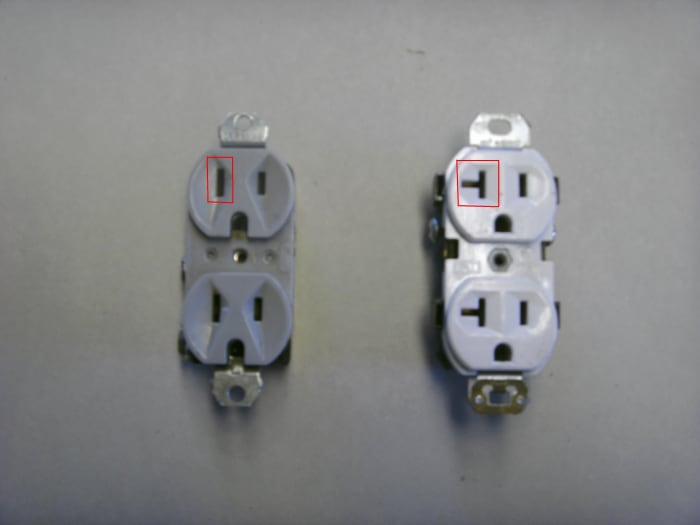
Visible difference between a 15-amp (gray, on left) and a 20-amp outlet (white, on right); note the slot shape circled in red.
wilderness
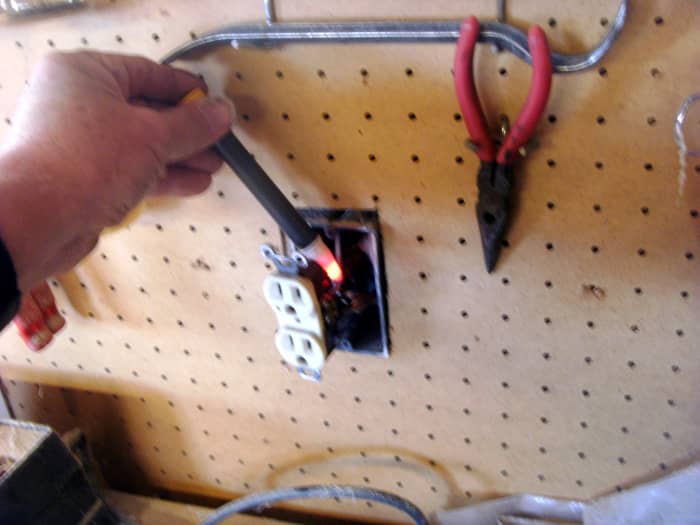
Checking an outlet to see if it is "hot" with a non-contact voltage detector.
Wilderness
How to Remove the Old Outlet and Box
- Turn off the power! Please don't begin your work by getting a nasty shock - turn off the power to the existing outlet you will be working with. Tape the breaker off so that no one else turns it back on while you're working. Make sure that you are working safely by testing that the outlet is dead by either plugging a radio or lamp into it or using a voltmeter or non-contact voltage detector. Don't turn the breaker back on until the job is complete; I, an electrician by trade, have been shocked too many times by turning the power on "for just a minute" and forgetting to turn it back off. Don't let it happen to you!
- Choose the existing outlet you will wire the new outlet into. The best choice is one that's almost, but not quite, directly through the wall from where you want the new one to be. In other words, you should first consider the outlets in the room on the other side of the wall. Second best is an outlet on the same or different interior wall, preferably one without insulation. It is much easier to get new wire through an empty wall than one filled with insulation.
- Remove screws and cover plates. With the power safely off, remove the cover plate on the old outlet and set it and the single screw that holds it aside for re-installation later. Then remove the two screws holding the outlet to the box behind it.
- The wires to the old outlet now to be need removed as well. Make careful note of which wire goes where. The black wire should go to the brass-colored screws, the white wire to the silver-colored screws, and the wire bare of insulation (the ground) to the green ground screw. There may be other wires in the box that are spliced together with wire nuts or that terminate on the outlet as well; note where each goes and mark them or draw a picture for future reference. Note: The old outlet could have a red wire as well. If so, this article on wiring a half-hot outlet has more information on this specialty application.
NOTE: A common practice is to plug the wires into the back of the outlet instead of attaching them to the screws on the side. If you have this kind of outlet, there is a small slot on the back of the outlet where a very small screwdriver or other tools can be inserted; this will release the spring tension on the electrical wire and allow it to be pulled out of the hole. Alternatively, the wires can simply be cut off if they are long enough and the outlet is to be replaced. - Remove the old box. Now, unless the new outlet will be almost directly through the wall from the old outlet, you need to remove the old box. Most home boxes are fastened with two nails, just above and below the box, that are driven into the stud just to one side. The best way to remove the box from the wall is to reach just alongside a metal cutting saw blade (a Sawzall, jigsaw, or even a bare hacksaw blade will do the trick). Cut the nails holding the box to the wall, but be aware that the wires entering the box are fastened to the same stud just above or below the box - make sure that you don't damage those wires, as such damage will likely require an electrician to re-wire that section of the house.
NOTE: If you don't care to cut the nails holding the old box, you can take the box out in pieces, since you won't be re-using it. Use a pair of pliers, diagonal cutters, a hammer, and a screwdriver—whatever it takes—to tear apart and remove the plastic box. Just tear it into little pieces and get it out of the wall. Again: don't damage the wire! Bend the nails that used to hold the box as best you can; the objective is to make sure they don't interfere with the little arms on the new box that needs to be attached to the wall. - As you draw the box out of the wall, the wire(s) in it will need to pass through the slots in the rear of the box and exit the box. Different boxes have different methods of holding those wires; take a good look at what you will have to do to let them exit the box. Loosen a screw, perhaps, or simply work them gently out of slots in the back.
Scroll to Continue
Read More From Dengarden
How to Run a Wire for the New Outlet
- Cut a hole. Start cutting a hole for the new plastic box at the new location. Make sure not to cut too large a hole, because the "ears" on the box must remain outside the wall; if they fit through the hole, the box will not clamp to the wall but will simply fall inside.
- Stagger the boxes. If the new location is through the wall from another existing outlet, be sure they don't line up exactly, because there won't be enough room in the wall for two boxes to fit back-to-back. Move the new one a few inches to one side. This is absolutely the preferred location for a new outlet: through the wall and not absolutely back-to-back, but between the same pair of studs as an existing outlet. It makes running the wire a very easy task (you won't be crawling the attic after all!) and removal of the existing box probably won't be necessary.
- Extend the wires. If you can reach into the hole where the new box will go and touch the existing box, you can skip all the hard work of running new wire through the attic; simply take one end of the new wire, reach inside the wall, and push it into the old box alongside the other wires. Push in about a foot of wire; you will cut it off to a more reasonable length later. Cut the other end a foot outside the wall, leaving a good-sized loop inside the wall to go up and back down into the top of the new box.
- If the two boxes aren't so conveniently located, however, it is time to begin pulling wire between the two outlets, and it is advisable to have a helper for this operation. A ¾" hole needs to be drilled, either up from the crawl space or down from the attic, into the center of the wall directly below or above the new outlet location. Begin by drilling a very small hole through the floor or ceiling right at the edge of the wall and in line with the new outlet location. Push a stiff wire (like a straightened clothes hanger) through, so that the wire is visible in the crawl space or attic. If necessary, remove a section of the baseboard or shoe molding on the floor, so that when it is replaced, the small hole will be covered. Be aware that a spinning drill bit can and will "grab" carpet and unravel it; take extreme care here. A very small hole in a ceiling can be covered with toothpaste to make it invisible.
- With your stiff wire poking through, carefully orient yourself into the crawl space. To determine where the wall is, measure 2½ inches over and drill a small hole up into the wall; if the hole does not come through the floor/ceiling into the living area, you are inside the wall. If your hole went into the wall, replace the small drill bit with a ¾" bit and drill again in the same place. The procedure is the same if you are working in the attic, but you should be able to see the top of the wall and that will help considerably. The 2x4 running along the top of the wall is generally visible under the attic insulation. Either way, repeat the procedure at the existing outlet location.
- Push one end of the new wire into the hole until it can be reached from the outlet location, and pull about a foot of wire out of the wall at that point. String the wire across to the next hole and estimate how much more will be needed to get it through the wall and pulled out. Cut off the length needed and push it into the drilled hole until it can be reached. Do not cut too little; far better to waste an extra 5' of electrical wire here than to waste all that work.
- Staple the wire to convenient rafters or floor joists every 4 feet or so with staples made for NM cable. These staples do not use a staple gun but are hammered in. Do not pinch the wire; drive the staples just far enough to hold the wire fairly firmly.
- What about insulation? If the wall has insulation, it will be virtually impossible to push the wire down from the attic, although you can probably push it up from the crawl space far enough to reach in the outlet hole and find it. A long (10 foot) piece of stiff wire or an electrician's "fish tape" can be invaluable as it is stiff enough to penetrate the insulation with a little effort and several tries.
- Use a helper to pull the wire down. With the stiff wire through the wall from the attic to the outlet location, tie or tape the electrical wire to it and, using a helper, pull it down into the room. This procedure will take some time and most likely several tries, but it will work. It is also about the only way to get that electrical wire through an insulated wall without tearing the entire wall apart.
Wiring the New Outlet
- Carefully score the soft outer sheath on the new wire about 6 inches from the end and pull the sheath just enough so that it tears and comes apart at the score. Try not to pull it off, just make sure that it will come off when you try (although it is not the end of the world if you do pull it off). Take a great deal of care not to cut into the individual wire insulation, as this will ruin the wire.
- Push the cable into the slots at the back of the box so that the uncut sheath is just inside the box. At the existing location, push all the existing wires there into the box in the same way; the sheath is obviously already gone, so cutting it isn't necessary. Work the box into the wall and turn the screws to clamp it onto the wall.
- The existing outlet may well have three or even more cables in the box that must be spliced together. Cut 6" pieces of additional black, white, and ground wire (remember that uninsulated wire in the cable is the ground). Remove the sheath and any paper wrapping from the new wire.
- Strip the end of each wire about ½" (there is a strip gauge on the back of the outlet). Splice all ground wires together, with that 6" piece you cut added in, using a wire nut. Holding the nut in one hand, pull firmly on each individual wire to make sure it is held well—better that a loose connection come out of the nut now than later.
- Repeat for the black wires and repeat again for the white wires. Fold the wires and wire nuts back neatly back into the box; this is where a deeper box is very nice as it gives more room for all the wires.
- The ground wire is to be terminated on the outlet on the green screw, the black wire on a brass-colored screw (same side as the smaller of the slots to plug things into), and the white wire on a silver-colored screw. Terminations can be made by bending a loop in the stripped wire, hooking it around the termination screw, and tightening the screw. Alternatively, most 15-amp and some 20-amp outlets have the hole in the back where the wire can be simply pushed in; a spring affair there grabs it and prevents it from falling out. If you loop your wire around the screw, loop it in the clockwise direction so that turning the screw will not tend to push it back off.
- Again, folding the wires as you do, push the outlet into the box and attach it with the two screws provided. Install a new cover plate.
- Repeat the entire process for the new outlet as well.
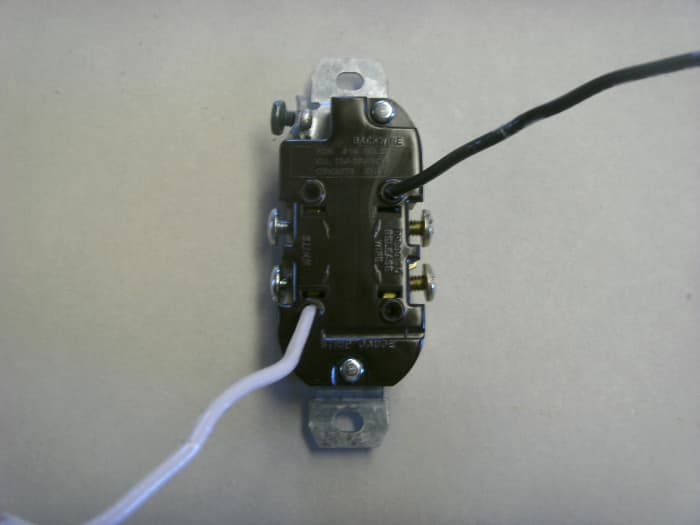
Pigtails pushed into holes in the back instead of being wrapped around the screws: Next to the wires, you can see another small hole to insert a small screwdriver into and release the wires from the internal spring clamp.
Wilderness
The difference in termination screw color: The screws shown on the left will get the white wire(s), with the ground wire going to the screw near the bottom of the photo. The screws on the right need the black wires.
Wilderness
GFCI Outlets Can Be Added
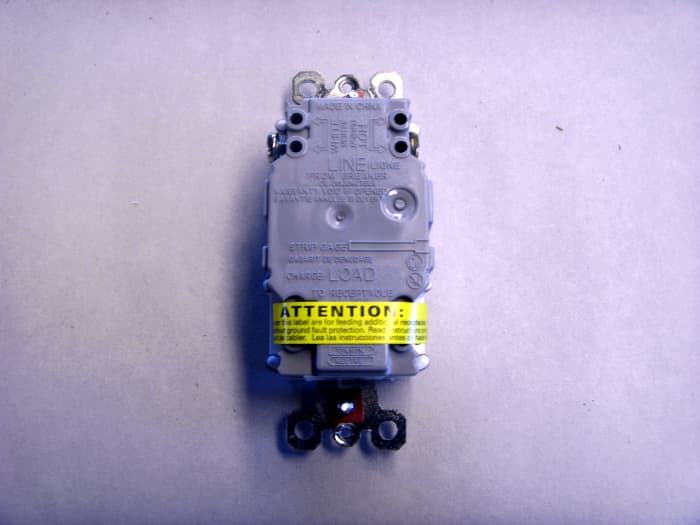
The back of the GFCI outlet, showing the factory-applied tape over the "load" terminals.
Wilderness
No Ground on the Existing Outlet?
If there is no ground wire in the old, existing box, the outlet should be replaced with a GFCI type. The new outlet will be protected by the new GFCI outlet installed in the old location, and so may be a normal outlet. So now you'll have two protected outlets instead of none.
- Splice all the existing wires together just as instructed above, but do not include the new black or white wires you have just installed. The 6-inch "pigtails" you added to the splices will terminate on the "line" terminals of the GFCI outlet; this is marked on the back of the outlet and there is usually a piece of tape covering the "load" terminals.
- The new wire is terminated on the "load" terminals of the GFCI outlet. Install the GFCI outlet into the box, along with its cover plate. The new outlet is wired normally, just as indicated in the previous section. There will be stickers in the box with the GFCI outlet indicating that the new outlet you have wired in is GFCI-protected and that it has no ground. These need to be attached to that new outlet. Remember, though, that if the new outlet suddenly goes dead, you need to check the GFCI and see if it has been tripped.
Congratulations! You now understand how to add a new outlet, pull the wire for it, and wire the outlet into an existing circuit. You also have a brand new outlet right where you need it!
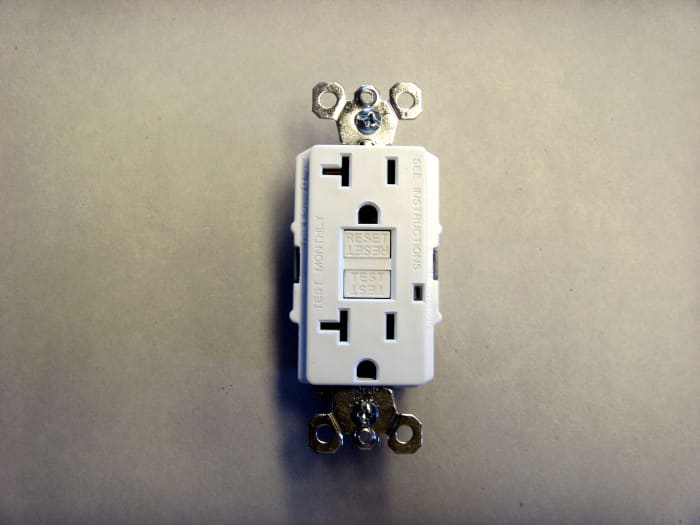
Front view of a 20-amp GFCI outlet. The "test" and "reset" buttons are visible in the center.
Wilderness
This article is accurate and true to the best of the author's knowledge. Content is for informational or entertainment purposes only and does not substitute for personal counsel or professional advice in business, financial, legal, or technical matters.
Questions & Answers
Question: Can we connect a new power socket to another power socket that is already connected to the main socket?
Answer: Outlets may be "daisy chained" - connected one to another - indefinitely. Be aware, though, that adding too many to a single circuit breaker is likely to end up tripping the breaker as too many devices can be plugged in and operated at the same time.
Question: I have an existing plug which already has a switch connected to it. Can I connect another set of wires to the outlet to feed power to another new outlet?
Answer: You may, but unless the old outlet is a half hot - half the outlet remains hot no matter where the switch is - it will be switched as well. Or, if the power enters the outlet box, then goes to the switch and back to the outlet, the new outlet could be made permanently hot by using the incoming wires rather than what is terminated on the old outlet.
Question: Can I convert one outlet into a junction box and create 3 new outlets from it?
Answer: Absolutely. As long as that junction box has access - you can remove the cover to get to the wires - it is fine. Just don't bury it inside the wall where it cannot be reached.
You could even leave the current outlet there and add three new outlets as well. If you do that, it would be better to go to one outlet, then another and then the final one rather than all three coming from the first box, though - if you did that the box would be very full and difficult to get the old outlet back into the box.
Question: On a GFCI, which wires (black, white, and ground) go to the line or load? Where do the lines coming first from the main panel go? Do they go to the line or load? I need clarification to install the GFCI properly.
Answer: The line wires are those coming from the panel. Load terminals are used when a downstream outlet is also to be protected by that GFCI. If they are not, the wires from the panel must be spliced to the wires going to the downstream outlet plus a short pigtail to go to the GFCI.
Question: I want to add an outdoor plug outlet and tap a light and switch from that. Any special considerations?
Answer: The outlet needs to be a GFCI, but other than that, no. Just splice into the incoming power with a wire nut for the switch and light and add a short jumper in the wire nut to go to the GFCI.
Question: I have a single switch box that turns both the fan and lights to bathroom on. Can I keep the single box and still be able to separate the fan and light switch to two switches?
Answer: Yes, you will most likely need additional wire, though. Your box will have a permanent hot in it, but probably only one outgoing switched wire. You will need to add a second switched line to either the fan or the light, and possibly one to each of them if the box does not contain a neutral wire (common in older construction).
Question: I would like to install a Sharp microwave drawer on a kitchen island. There is an electrical outlet on the island, but of course, it is facing the wrong way. The simple solution is just to turn it around and put a blank wall cover on the outside, but is it possible to connect another outlet for the microwave? I am concerned that codes for kitchens and bathrooms might not allow me to connect another outlet to an existing one.
Answer: Yes, you may connect another outlet to the existing one.
Question: How do I replace a standard outlet with a GFCI outlet?
Answer: The same way you do any other outlet. Here are the instructions: https://dengarden.com/home-improvement/How-To-Inst...
Question: Kitchen area: I would like to move the outlet up the wall to the top of the cabinetry (about 36 inches from current location), same vertical line. Acknowledging that junction boxes can't be buried behind drywall, how do I "hide" the junction box to completely eliminate that outlet?
Answer: If all the wires at the original location come from above it just might be possible to simply remove the box and put the wires into a new box further up the wall.
If that isn't possible the best that can be done is to build a door in front of the old box, leaving it where it is. Not much better than simply putting a blank plate on, though. Another option is to put that blank plate on and paint it (or wallpaper it, whatever the wall is) with paint matching the wall. At least it won't be as obvious that way.
There is no real answer to leaving it where it is without it being visible, though. It must be accessible.
Question: I have an external light fixture that I want to eliminate and instead run a duplex AC outlet and fan. Would this work?
Answer: Sure, that will work fine. Be aware, though, that the entire outlet will be switched unless you eliminate the switch that operates the light fixture.
Question: If someone added an interior wall and wanted to add an outlet would you recommend to pull the power from an existing wall, or from the attic?
Answer: Either one will work fine, but the attic may be easier. At least it may be easier if you can find a junction box in the ceiling - most homes will not have any. Another option is to put it on a lighting circuit, taking power from a ceiling light that has constant power in it.
On the other hand, if you choose to use an existing outlet you already know it is on an outlet circuit and that the power you need is there.
Question: I would like to add a GFCI outlet in a bathroom. There is a circuit dedicated to a rarely used electric radiant heat circuit in the wall I want to use. Can I splice a GFCI outlet into the circuit?
Answer: You can, but be aware that bathrooms very often have high amperage devices in use. Hair dryers, for instance, or curling irons. Putting too much load on the radiant heat circuit may trip the breaker if the heat is in use. It's why bathrooms are now required to have a dedicated 20 amp circuit.
Question: I have an older house that's not grounded. The bathroom does not have an outlet. Is adding a new outlet the same?
Answer: You may add an outlet, but it must be a GFCI outlet. In fact, every outlet you add OR replace must be a GFCI or protected by one.
Question: I want to add one additional outlet, but the one I need to connect to has one line (two wires + ground) on the right side and another line (two wires + ground) on the left. Can I join one side with wire nuts and use a pigtail to connect to the current outlet?
Answer: Yes, that's exactly what you do. Just join all the wires from one side together, including the new one to the new outlet and a short, 6" pigtail to go to the current outlet. Repeat on the other side.
Question: I'm wall mounting a tv. Rather than add a new outlet below it near the baseboard, I want to run Romex from the outlet directly behind the tv and tap into the existing lower outlet. The existing outlet already has 2 hot and 2 neutral wires. Is it safe to run new a Romex to this which will add a third set of hot and neutral wires?
Answer: As long as you can comfortably fold the wires into the box and still get the outlet in as well it is fine. There are (rather extensive) rules for how much wire can be in a box, but that's a good general rule of thumb. When you have to use a hammer handle to force the outlet back in, you've got way too much wire in there. Three #14 cables should not be a problem unless it is a very shallow box, and your solution to a TV outlet is a common one.
Question: Can I add an outlet to an existing outlet that is half hot? So the the existing outlet, one half is controlled by a switch and the other half is always on/hot. Can I add a new outlet to this existing outlet by connecting it to just the hot half?
Answer: Yes, that will work fine. As you surmise, simply tie the new outlet to only the existing hot half.
Question: Can I add another outlet to an outlet controlled by a switch and make them both controlled by the switch? How do I wire two outlets to be controlled by the same switch?
Answer: Absolutely you can. Using 12-3 wire (for a 20 amp circuit, or 14-3 wire for a 15 amp circuit) splice the new wire to both wires on the "hot" side of the outlet and to the white wire. You may need to cut 6" pieces of wire to go from each wire nut to the outlet. Splice the ground to the existing ground as well.
Run that new, 12-3 wire, to the new outlet, and wire it with the black and red to the brass screws, the white to the silver terminal and hook up the ground. Or, if you don't want half hot outlets but both halves to be switched, you can use 12-2 wire instead.
Question: Can you plug an adapter with four places to plug other things into a gfi outlet?
Answer: I've never tried and never thought about it. Considering how a GFCI works, what it does, I can't see any reason why not, though. After all, there are two outlets on the GFCI, and it can operate other outlets on the same circuit.
You might have to be careful, though, about the mechanics of the adapter. Some have a screw that is supposed to screw into the hole where the cover plate screws on and a GFCI doesn't have that hole. I'm not real positive about the spacing of the outlets either, if the adapter plugs into both locations in the outlet.
© 2012 Dan Harmon
Dan Harmon (author) from Boise, Idaho on August 17, 2019:
To keep from making such a sharp angle coming through the stud and into the punch out right above. It makes a much easier curve (and lower electrical resistance) plus it is easier to put the wire into a hole a little further from the stud.
If the box were on the other side of the stud it would be reversed.
Gary on August 17, 2019:
Why do electricians pull the 14/2 wire bundle that is coming from the left, going in the right side of the rear punch out hole on the gang box, & the 14/2 wire that is going to the next outlet to the Right of that outlet, crosses the other 14/2 wire & is going in the LEFT side rear Punch out hole on the outlet Gang box ?
It is the 14/2 wire from right, goes into leftside, & the wire from left goes into right side, why?
Thanks, Gary
Dan Harmon (author) from Boise, Idaho on April 16, 2019:
@Jeff A few days ago, helping my daughter add some equipment to her shirt printing business. I also have one on my air compressor. They aren't common, but they do exist.
Yes, a 20 amp circuit may have a 15 amp outlet. It just can't go the other way, with a 20 amp outlet on a 15 amp circuit.
Jeff on April 16, 2019:
Per NEC code, a 20A circuit (20A breaker and #12) may have 20A or 15A receptacles. When was the last time you saw a 20A plug?
Dan Harmon (author) from Boise, Idaho on December 31, 2018:
@Kim:
Yes, that will work fine. You must use a GFCI with a cover that allows a cord to be plugged in and still close (most of those available are of this type. Make sure you caulk and weatherproof the entrance through the house siding.
Kim Jin on December 31, 2018:
I would like to add an exterior outlet by tapping it to the existing interior outlet. Is it acceptable to do this? My plan is to tap the interior outlet and will use weather resistant GFCI for the exterior outlet.
Dan Harmon (author) from Boise, Idaho on October 06, 2018:
@Marie:
Yes. Disconnect the wires from the switched outlet and cap them off with wire nuts so they can't short out. Run new wire from the unswitched outlet to power the one that you disconnected. It is possible that that additional wiring is already in place and you won't have to add it.
Another possibility, much easier, is to remove the wires from the switch and splice them together with a wire nut. This disables the switch, but makes the switched outlet powered all the time. You can either re-install the switch, which will now do nothing, or remove it completely and install a blank cover plate over the opening where it was.
Is the switch there in order to make the garage door inoperable while on vacation for long periods? Not that it changes anything, but might be something to consider - I unplug mine when leaving for long periods even though it means entering through the front door and plugging it back in when I do get home.
Make sure the power is off before doing anything!
Marie on October 06, 2018:
I have 2 outlets in my garage one is on a switch and the other isn't. I would like to take the one off the switch and put it on the same line as the other one. I was told its a simple rewiring. So my question to you is can I use some of the steps you had mention above to help me do this? So I can get rid of this yellow cord I have going for the one plug to my garage opener.
Dan Harmon (author) from Boise, Idaho on September 23, 2018:
@Ron Kim:
I'm not sure what your question is. The article above gives explicit instructions on how to do just that: is there something you didn't understand?
ron kim on September 23, 2018:
how can i connect to existing electrical wire to make a new many outlet
Monrovia on June 19, 2018:
This is so special. I have only glanced this information and am impressed with your and delivery, I felt I could do this that's why I was searching. Finding your page ends my search. Now I can study and calculate confidently.
Thank You
Dan Harmon (author) from Boise, Idaho on October 30, 2017:
Absolutely. In fact, code requires exterior outlets at each entrance and any utilities such as an air conditioner unit. They must all be GFI protected, however, and have a protective cover over them that allows something to be plugged in and the cover closed. I added an outlet in my eave last year, complete with a light sensor to turn the Xmas lights off during the day.
Irene Glow on October 30, 2017:
Are exterior electrical outlets permitted on exterior walls to
plug in Xmas lights?
Dan Harmon (author) from Boise, Idaho on May 18, 2017:
Not sure I understand your question, but...use the same wires that went to the outlet in that box if replacing it. If adding a new outlet, splice your new wire to those wires that go to an existing outlet and run it to the new location.
Bill Neil on March 09, 2017:
Your Hub Page was very helpful and informative . You did a great job of explaining the process and what to do when for example there is no ground . Thanks for your help .
Dan Harmon (author) from Boise, Idaho on October 28, 2016:
The only really difficult part is physically running the wire. Once that is accomplished the rest is quite simple. Good luck with your project.
Stacy Greathouse on October 28, 2016:
I need 2 add outlet in my garage
I have Never done electric but we need it ASAP.. Is it really complicated?
Dan Harmon (author) from Boise, Idaho on October 06, 2016:
Sure, you can use the same basic instructions, modifying them as necessary to get wire to the floor box. If it's a crawl space it should be easy; if there is a finished basement you're going to have to open up the ceiling there.
The actual wiring inside a floor box is likely a little different as well, but it will come with instructions specific to the brand you buy, and the basics of where to put the wire on an outlet will never change.
It does look like your box will need a strain relief where the wire enters the box, but that should be about the only real difference. Those can be picked up at any local home improvement store.
Mark Sterling on October 06, 2016:
I want to add an outlet, but instead of inside the wall, I want to add it in our living room floor. I found this floor box that I like, and want to know if it is safe to use this method to wire it? If not, how should I go about wiring it? (If you have any experience with these kinds)
https://www.amazon.com/TOPGREENER-705506-Weather-R...
Dan Harmon (author) from Boise, Idaho on September 11, 2016:
Probably. If that outlet is also running a large disposal, instant hot water or some other high current device it is possible that the breaker will pop, but it is a common practice to put even the disposal and dishwasher together. Kitchen circuits are required to be 20 amp circuits, although some older homes may not be, and will usually handle the current draw of two appliances for at least short periods of time. Disposals, for instance, seldom run for more than a few seconds.
a.52bourdeaux@gmail.com on September 11, 2016:
Can I add a dishwasher to an electrical outlet
Amy Jo on September 06, 2016:
I called my Dad to walk me thru repairing an outlet, however he wasn't available. Your artcle was well written, easy to understand. THX
Dan Harmon (author) from Boise, Idaho on September 01, 2016:
If the breaker says 15, then 14 gauge wire is sufficient - it is possible that it was installed larger than necessary. But do make positive that you have the right breaker for that circuit.
Brian on September 01, 2016:
So I was reading about the wire requirements and I bought the 14 2 wire because the circuit breaker to that set of electrical receptacles says 15 but I just noticed all the preexisting wire is the 12 2.
What do I do?
Dan Harmon (author) from Boise, Idaho on March 02, 2014:
You're more than welcome; glad you found it useful.
1countrylady@live.com on March 02, 2014:
Great article. Thanks for taking the time to explain, step by step, and with pics. :)
Blogger at Best from Detroit MI on January 05, 2014:
Great article did this project a few months ago and I wish I saw your post earlier it would have been a lot easier! Great article voted up!
Dan Harmon (author) from Boise, Idaho on November 28, 2013:
Extremely variable, anywhere from perhaps $200 to $1,000.
Amos on November 27, 2013:
How much is the market related to install a socket outlet, light -switch and DB
Dan Harmon (author) from Boise, Idaho on April 03, 2013:
There should be no problem, but there are a couple of things to keep in mind. Garage outlets are required to be GFCI protected, and presumably your existing ones are - proper wiring to an existing outlet can also protect additional outlets. The new light would preferably be wired in such a way that it is NOT protected, but should work either way.
The biggest potential problem will be overloading the circuit. Most garages have only one circuit in them; adding a dozen outlets and using them all at the same time could overload the circuit. Adding outlets just for convenience purposes, for use for only short periods, should cause no problem, though.
You really should have no problems.
Metroiddad on April 03, 2013:
I want to add more outlets to my garage and a motion light to the side of the garage where it is dark for safety. Can I use existing outlets and lighting for this?
Dan Harmon (author) from Boise, Idaho on January 18, 2013:
Glad you found it useful. The biggest problem and task is always pulling the wire for a new outlet, but that can often be minimized.
Shea on January 17, 2013:
Great hub! I had to learn some of this the hard way years ago when I started changing out sockets and switches. I still learned a few more things here though. Thanks
Dan Harmon (author) from Boise, Idaho on April 30, 2012:
@ grayson: You can, but there can be problems. Code requires that kitchens have two dedicated 20 amp circuits above countertops for use by small appliances. It used to be just one circuit, but that just isn't enough any more.
Adding a plug to that circuit is adding additional load onto an already high loaded kitchen circuit, and you may find the circuit breaker blowing. It is also against code, although I doubt that an inspector would gripe at a late date change like that.
grayson- hrags1234@aol.com on April 30, 2012:
Can I add a receptacle to my garage by connecting it to a 20 amp GFCi receptacle from my kitchen
Dan Harmon (author) from Boise, Idaho on February 26, 2012:
Thanks, GiftedGrandma. Being a jack of all trades - I am myself - is a very handy thing in today's economy. It has certainly averted a variety of service calls!
GiftedGrandma from USA on February 26, 2012:
Nice hub! Hubby is quite good a this..jack of all trades...what a blessing.
Dan Harmon (author) from Boise, Idaho on February 23, 2012:
Sure - that would be a good way to get your feet wet.
Be careful, though, with dimmers. Some dimmers require a neutral wire to the dimmer, and many switch boxes do not have have that. To find out, remove the switch (don't disconnect it, just pull it out AFTER TURNING THE POWER OFF) and look in the box behind the switch. If there are two or more white wires spliced together and NOT going to the switch they are almost certainly neutrals.
If there is no neutral, make sure that you purchase dimmers that do not require a neutral wire connection. Make sure as well that you buy dimmers appropriate to your lights; while some fluorescent fixtures can be dimmed, they require a special dimmer. Make sure as well that any dimmer purchased can handle the wattage of the lamp (or lamps for a fixture with more than one bulb).
Have fun choosing a dimmer; there are so many different types and looks it can take a while to finally decide what you want to see on your wall. I've got one you simply tap to turn on or off or hold your finger on to dim or brighten. No moving parts at all.
Kelly Kline Burnett from Madison, Wisconsin on February 23, 2012:
wilderness,
My basement needs lights and outlets. IF I get ambitious, I will take up this task. First I wish to add dimmers to the living quarters.
If you were advising how to start learning electrical - would changing out light switches to dimmer switches be a good starting place?
Dan Harmon (author) from Boise, Idaho on January 28, 2012:
Thank you. Once I began writing I realized there was more to the task that I had considered and the hub ended up a little long, but that's OK as long as it covers the subject.
Brad Masters from Southern California on January 28, 2012:
Wilderness
Well done and interesting article.
Thanks
Source: https://dengarden.com/home-improvement/adding-electrical-outlets-how-to-wire-an-outlet-to-an-existing-one
0 Response to "How Easy is It to Move an Outlet to Another Breaker"
Post a Comment